

Last Updated: October 25, 2026
Quick Summary
A clean plumbing repair process protects your home from water damage and mold by using proper containment, diagnosis, and cleanup throughout the repair. Following five steps, diagnosis, preparation, containment, inspection, and cleanup, ensures your plumbing is fixed without leaving your space damaged or messy.
- Diagnosis comes first to determine whether the problem requires a plunger, drain auger, or professional pipe inspection equipment.
- Clear the work area, protect surfaces with towels or plastic sheeting, and prepare information about your home’s age and pipe materials before the plumber arrives.
- Containment requires buckets under the work area and drop cloths taped to baseboards to prevent water from spreading to cabinets and floors.
- After repair, test water flow, check for odors, and inspect for cracks or leaks to verify the blockage was fully cleared.
- Professional cleanup includes removing all drop cloths, wiping dry surfaces, sweeping debris, and disposing of removed materials.
Table of Contents
- Why a Clean Plumbing Repair Process Matters
- Step 1: Diagnose the Problem Before Work Begins
- Step 2: Prepare Your Space and Ask the Right Questions
- Step 3: Set Up Containment and Protection During Repair
- Plumbing Repair Preparation: What Homeowners Should Do
- Step 4: Use the Plumbing Repair Inspection Checklist
- Step 5: Complete Your Plumbing Repair Cleanup Checklist
- Schedule Your Next Plumbing Service
- Frequently Asked Questions
Why a Clean Plumbing Repair Process Matters
A clean plumbing repair process protects your home, reduces stress, and prevents costly damage from water spillage or debris. When a plumber arrives without a clear plan for containment and cleanup, you risk stained carpets, water damage to walls, and mold growth that costs thousands to remediate. At Indy Plumbing, we’ve learned that the difference between a repair that leaves your home spotless and one that creates a mess isn’t luck, it’s preparation.
The stakes are real. A burst pipe under your kitchen sink can soak drywall and flooring in minutes. A clogged main sewer line backing up into your basement can contaminate surfaces and create a health hazard (Flood cleanup: keep in mind indoor air quality). Without proper containment, the repair itself becomes a secondary disaster.
The process we outline below covers diagnosis, preparation, containment, inspection, and cleanup. Follow these steps and you’ll know exactly what to expect, how to prepare your home, and when to call a professional.
Step 1: Diagnose the Problem Before Work Begins
Diagnosis comes first because the wrong repair method wastes time and money. Before any plunger touches a drain or any snake enters a pipe, you need to understand what’s actually blocking the flow.
Start by observing the symptoms. Is the drain slow or completely backed up? Does water pool in the sink, or does it drain after a few minutes? Is the problem isolated to one fixture, or does it affect multiple drains throughout the home?
Listen and look for clues. Gurgling sounds when water drains suggest air trapped by a blockage. Foul odors indicate decomposing food waste or grease buildup. Visible debris around the drain strainer shows what’s accumulating.
Once you’ve identified the symptoms, you can decide whether to attempt a simple remedy or book a drain cleaning service.
Understanding the symptoms and causes of your plumbing problem helps determine the right repair approach.
| Symptom | Likely Cause | Repair Method |
|---|---|---|
| Slow kitchen sink drain | Grease and oil from cooking | Plunger or drain auger |
| Hair and soap buildup | Bathroom drain blockage | Drain auger or professional cleaning |
| Water backing up in basement | Main sewer line blockage | Professional pipe inspection equipment |
| Gurgling sounds when draining | Air trapped by blockage | Professional diagnosis needed |
| Foul odors from drain | Decomposing food waste or grease | Drain cleaning service |
| Mineral deposits | Hard water buildup | Professional cleaning or enzyme treatment |
| Tree roots in sewer drain | Root intrusion | Professional pipe inspection and removal |
Step 2: Prepare Your Space and Ask the Right Questions
Preparation prevents surprises and keeps the repair contained. Before the plumber arrives, clear the work area, protect your belongings, and have answers ready to the questions they’ll ask.
Clear the space under and around the affected fixture. Remove items from under the sink, take rugs off the bathroom floor, and move decorations away from walls.
Protect surfaces that water might reach. Lay down towels or old sheets around the work zone.
Prepare information about your plumbing system. Know the age of your home and whether the pipes are copper, PVC, galvanized steel, or cast iron.
Learn what to expect when hiring a professional drain cleaning service, from initial inspection to the solutions that restore flow and keep your plumbing smooth.
Ask the plumber about their approach before they start. Will they use a plunger, a drain auger, hot water flushing, or enzyme-based cleaners? What’s their process for containing water and debris?
Step 3: Set Up Containment and Protection During Repair
Containment is the barrier between a clean repair and water damage. Before any work begins, the plumber should set up physical protection that stops water, debris, and mess from spreading.
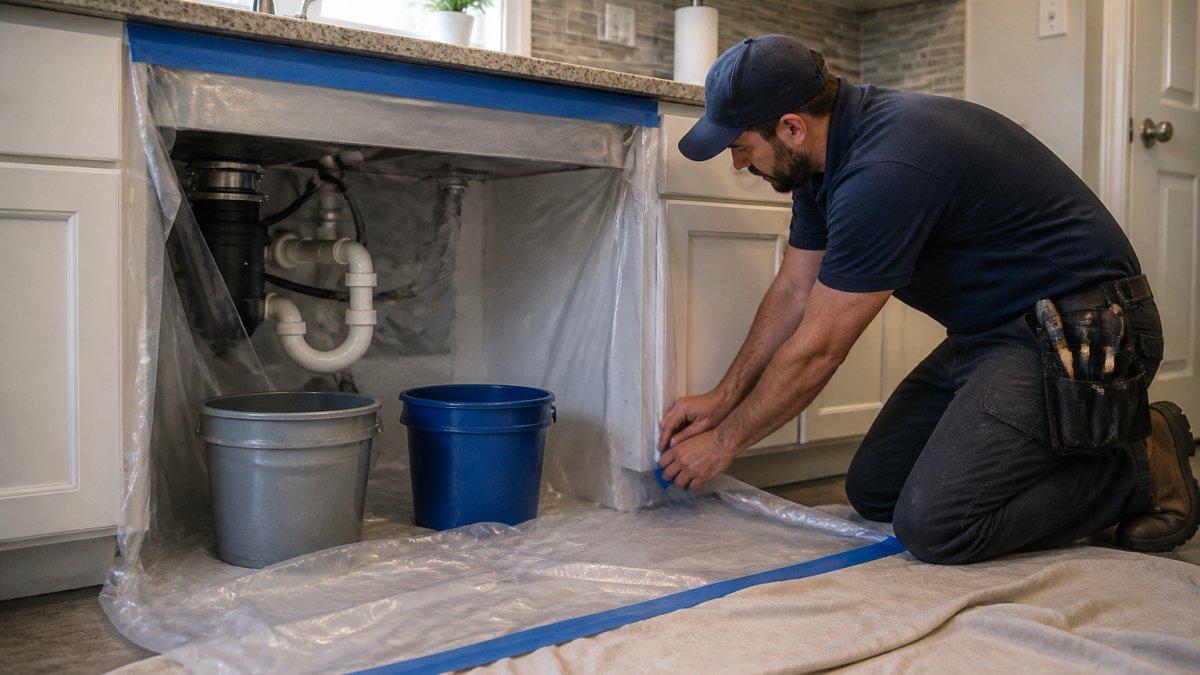
The first line of defense is placement of buckets and towels directly under the work area. When the plumber removes a P-trap or opens a drain line, water trapped in the pipe will spill.
Next comes the protective barrier. Drop cloths or plastic sheeting should cover the floor in a radius around the work area.
The plumber should also protect the sink or fixture itself. If using a plunger, they’ll fill the sink with water, so any splashing should be contained.
For hot water flushing or enzyme-based cleaner applications, containment prevents chemical splashes from damaging nearby surfaces.
Watch out: Never mix chemical drain cleaners with other products (Use household chemicals safely). If a previous attempt used one type of cleaner, tell the plumber before they apply another.
Plumbing Repair Preparation: What Homeowners Should Do
Your preparation directly affects how smoothly the repair goes and how clean your home stays afterward. Focus on three areas: information, access, and communication.
Gather information about your plumbing system before the work begins. Know your home’s age, the material of your pipes, and the location of your main shut-off valve. If you’ve had previous repairs, document what was done and when.
Ensure clear access to the work area. Move furniture, clear cabinets, and remove obstacles from the path to the fixture. If the repair involves a basement pipe or crawl space, make sure the plumber can reach it safely. Turn off any appliances that use water, washing machines, dishwashers, water heaters, before the plumber starts.
Communicate your priorities and concerns. If you have young children or pets, let the plumber know so they can work safely around them. If you’re concerned about chemical drain cleaners due to old pipes or septic systems, discuss alternatives like mechanical clearing or enzyme-based options.
Step 4: Use the Plumbing Repair Inspection Checklist
An inspection checklist ensures nothing is missed and the repair actually solved the problem. Use this before, during, and after the work to verify the clean plumbing repair process is complete.
Before the repair starts:
- Visual inspection of the affected drain or pipe for visible blockages or damage
- Water flow test: does water drain at all, or is it completely blocked?
- Odor check: does the drain smell normal or foul?
- Listening test: do you hear gurgling or other unusual sounds?
During the repair:
- Confirm the blockage location and cause (grease, mineral buildup, debris, tree roots)
- Verify the plumber is using appropriate tools for your pipe material
- Check that containment barriers are in place before work begins
- Observe whether the plumber inspects the pipe with a camera if the blockage is deep
After the repair:
- Water flow test: does water drain freely and quickly?
- Multiple drain test: do all drains in the home flow normally, or just the one that was repaired?
- Odor check: is the foul smell gone?
- Visual inspection: are there any cracks, leaks, or damage to pipes or fixtures?
If the drain still drains slowly or backs up again within a week, the blockage wasn’t fully cleared. This is your signal that the problem runs deeper, likely in the main sewer line or beyond the reach of basic tools. A professional pipe inspection reveals exactly where the blockage is and whether it’s a simple clog or a structural issue like tree root intrusion or pipe damage.
Document the results in writing. Ask the plumber for a summary of what they found, what they did, and what they recommend for prevention. This record helps future plumbers understand your system and prevents repeated guesswork.
Step 5: Complete Your Plumbing Repair Cleanup Checklist
Cleanup is the final step in a clean plumbing repair process. A professional should leave your home as clean as they found it, with all water, debris, and tools removed.
The cleanup checklist includes:
- Remove all drop cloths, plastic sheeting, and towels used during the repair
- Wipe down the work area with a dry cloth to remove water droplets or residue
- Empty and remove all buckets and containers used to catch water
- Sweep or vacuum the floor to remove any debris or dirt tracked in
- Check cabinets and adjacent areas for water splashes and wipe them dry
- Dispose of all removed materials (old P-traps, debris from the drain, etc.) in your trash or their vehicle
- Test the drain one final time to confirm water flows freely
- Leave the area organized with all tools and materials removed
Ask the plumber to walk you through the cleanup. Point out any areas where water might have splashed or debris might have landed. If the repair involved the main sewer line, ask them to show you where the clean-out is located and how to access it if you need future maintenance.
For enzyme-based cleaners or other treatments applied during the repair, ask about follow-up care. Some cleaners work best if you avoid using the drain for a few hours. Others require multiple applications. Understanding these details ensures the repair delivers lasting results.
Schedule Your Next Plumbing Service
A clean plumbing repair process starts with diagnosis and ends with verification. If you’ve followed the steps above and your drain still backs up, or if you suspect a problem deeper in your main sewer line, professional assessment is the next step.
Get transparent pricing information before booking a plumbing repair service, understanding what affects costs and how to avoid unexpected charges.
At Indy Plumbing, we handle everything from simple drain cleaning to complex pipe repairs in heritage homes. Our licensed and insured team uses proper containment for every job, inspects pipes with camera equipment to pinpoint blockages, and leaves your home spotless when we’re done. We serve Mississauga, Orangeville, and Milton with 24/7 emergency support and transparent pricing with no hidden fees.
When you’re ready to schedule, we’ll confirm your symptoms, discuss your concerns about heritage plumbing or chemical sensitivity, and walk you through what to expect. Get started with Indy Plumbing and restore full water flow to your home.
Frequently Asked Questions
How can I keep a plumbing repair from making a mess?
Start by clearing the work area of personal items and covering floors with drop cloths or plastic sheeting. Ask your plumber in advance what containment steps they’ll take. Most professionals use plastic barriers, towels, and buckets to catch water and debris. Ensure access to water shut-offs is clear, and discuss where they’ll place tools and materials. A clean plumbing repair process depends on preparation before work begins, the more you communicate upfront, the better the protection.
What should I ask a plumber before work begins?
Ask about their timeline, what areas they’ll need access to, whether they’ll shut off water to the entire house or just one fixture, what protective measures they’ll use, and how they’ll handle debris removal. Request a walkthrough of their process and ask how they’ll verify the repair is complete. Understanding their approach prevents surprises and ensures a clean plumbing repair process from start to finish.
How can I tell whether a plumbing repair was completed properly?
Use a plumbing repair inspection checklist: confirm water flows normally without leaks, check that drains move freely without slow drainage or backup, inspect the repaired area for visible damage or loose fittings, and test related fixtures to ensure nothing was affected. Ask your plumber to walk you through the repair and show you the problem area before and after. Request documentation of what was fixed and any materials used.
What do plumbers use instead of chemical drain cleaners?
Professional plumbers typically use a plumber’s snake or drain auger to physically remove blockages, hot water flushing for minor clogs, enzyme-based cleaners for grease and organic debris, or baking soda and vinegar for preventive maintenance. These methods are safer for your pipes than harsh chemical drain cleaners. A plumber will assess whether the clog is caused by grease, mineral buildup, food waste, or pipe damage before selecting the removal method.
A clogged drain or slow water flow disrupts your daily routine and risks water damage if left untreated. The clean plumbing repair process we’ve outlined, diagnosis, preparation, containment, inspection, and cleanup, transforms a stressful repair into a controlled, predictable experience. Schedule your next plumbing service with Indy Plumbing and let our team handle the mess while you focus on what matters.

Comments are closed